Filling a cavity with a level set method
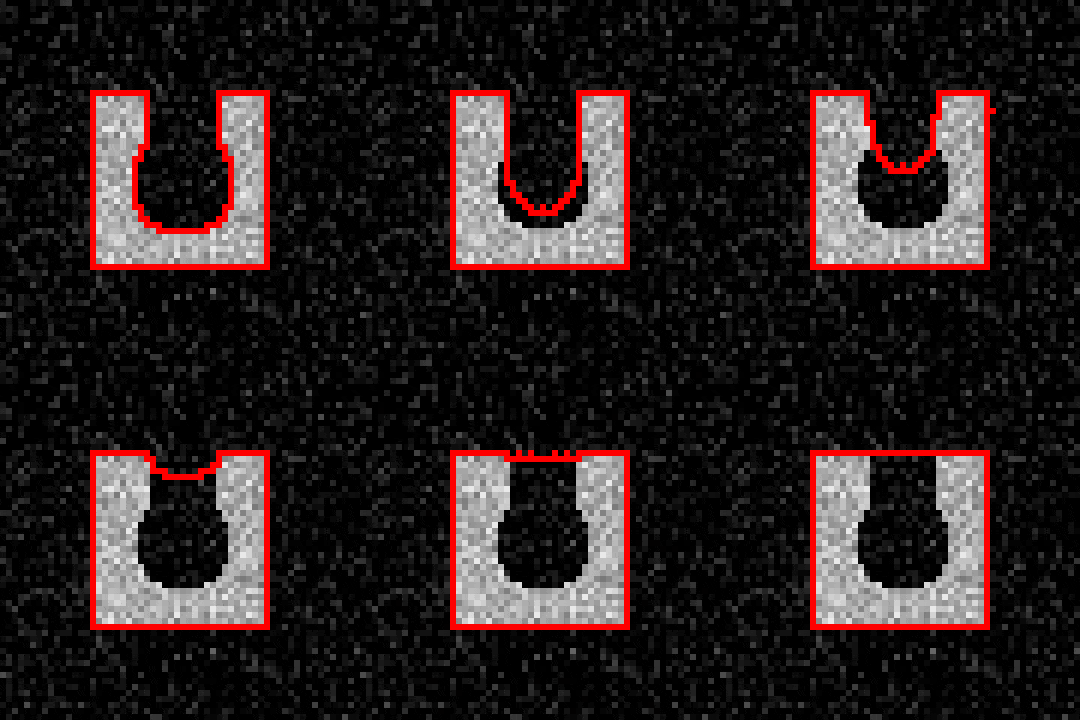
This example shows how to fill a concave cavity using a level set method.

Edge of segmented region shown as a red outline on top of the original image. The animation shows evolution of the edge as a function of iteration number.
def levelset_fill_cavity():
        """
        Demonstrates how to fill a non-convex cavity using a level-set method.
        """

        # Create an image that contains a rectangle with a cavity in its edge.
        # For this example we make a 2D image for easier visualization,
        # but everything should work the same for a 3D volume image, too.
        c = 30 # Radius of the image
        geom = pi.newimage(ImageDataType.UINT8, 2 * c, 2 * c)
        pi.box(geom, [c - 15, c - 15, 0], 30, 128)      # The box
        pi.sphere(geom, [c, c, 0], 8, 0)                # Part of cavity
        pi.sphere(geom, [c, c - 6, 0], 6, 0)            # Part of cavity
        pi.sphere(geom, [c, c - 12, 0], 6, 0)           # Part of cavity

        # Noise to make the image more realistic
        pi.noise(geom, 0, 20)

        # Save the geometry
        pi.writetif(geom, output_file('levelset_geom'))


        # Initialize an image that holds the level set function.
        # After iteration below, the segmentation is the part of phi
        # that has positive value.
        phi = pi.newlike(geom, ImageDataType.FLOAT32)

        # Update phi iteratively
        for n in np.arange(0, 200):
                print(f"Iteration {n}" )

                # Construct force field that acts on the surface defined by phi
                # The force will be the sum of three terms.
                F = pi.newlike(phi)


                # First term: the force is positive inside the object and negative everywhere else.
                # This makes the surface take the shape of the object.
                pi.copy(geom, F)
                pi.divide(F, 128)
                pi.subtract(F, 0.5)


                # Second term: Penalize high curvature by making curvy
                # regions less curved.
                kappa = pi.newlike(phi)
                pi.meancurvature(phi, kappa, 0.5)

                # Multiply the curvature values to scale them correctly.
                pi.multiply(kappa, -5)

                # Remove negative curvature values. They correspond to
                # convex shapes, and we want to zero those so that
                # they don't have any effect on the surface.
                pi.max(kappa, 0)

                # Add kappa to the force term
                pi.add(F, kappa)


                # Third term: Normal force
                # This term makes the surface move towards its normal.
                # This term is not required in this example.
                #L = pi.newlike(phi)
                #pi.gradientmagnitude(phi, L, 0.75, 0)
                #pi.multiply(L, 0.01)
                #pi.add(F, L)


                # Smooth the total force a little bit
                # This is not strictly by the book, but smoothing seems to
                # make phi converge faster to a smoother result.
                tmp = pi.newlike(F)
                pi.gaussfilter(F, tmp, 0.5, BoundaryCondition.NEAREST)
                pi.set(F, tmp)


                # Multiply by time step
                dt = 1
                pi.multiply(F, dt)

                # Add force*dt to the surface
                pi.add(phi, F)


                # Convert phi to segmentation and save it for visualization purposes
                vis = pi.newlike(phi)
                pi.copy(phi, vis)
                pi.threshold(vis, 0)
                pi.convert(vis, ImageDataType.UINT8)
                pi.writetif(vis, output_file(f"./levelset_result/{n}"))